RSSI means Received Signal Strength Indication and it is a value that indicates the power in a received radio signal. It becomes extremely handy to have this measurement enabled on the transmitter because it can trigger an alert when we are flying too far away risking to lose communication with the receiver.
In the following, we will see how to configure this feature on the Devo 7E loaded with Deviation TX firmware for the X6B receiver, i.e. AFHD-2A protocol. Moreover, we will integrate RSSI on Betaflight so the value shows up in real time on the OSD.
Loading Deviation firmware and installing A7105 module
Since we are going to bind Devo 7E with X6B receiver which uses FlySky protocol, first thing to do is load Deviation TX firmware in the Devo 7E (always use the latest release): the download is available here under “Deviation Releases” where you can find both stable releases and “nightly builds”. There are many guides on how to load Deviation TX firmware so we will not go in detail through the entire process. However, it is pretty simple: connect the radio to the computer using the supplied USB cable, power it up in “Program Update” mode (press hold “EXT” on TX and then turn it on), install the drivers and load the DFU file present in the archive (downloaded before) using Walkera DfuSe USB Upgrade Tool. Once that is done, just it is just a matter of copying inside the transmitter (press hold “ENT” on TX and then turn it on to connect in USB mode) all the file present in the archive excluding .zip and .dfu.
To bind protocols which are not supported by CYRF6936 module (the one that is there by default), such as FlySky, we need additional RF modules. For FlySky protocol, we need to solder the A7105 RF module inside the transmitter: I suggest this version that has integrated Power Amplifier (PA).
For the connection refer to the official documentation; beware that after Deviation release 4.0.1 some connections change (everything is well described with images showing the pinout).
Once the soldering job is finished, we need to enable the module via software: connect again the TX to the computer in USB mode and edit the lines referring to the A7105 module in hardware.ini file like shown below (has_pa-a7105 set to 1 only if you have the version with integrated PA):
[modules]
.......................
  enable-a7105    = A13
  has_pa-a7105    = 1
.......................
As a side note, since modifying the Devo 7E could be a little tricky if not particularly familiar with soldering, there is a new multi-protocol radio already loaded with Deviation firmware, inside which are already installed additional RF modules, including the FlySky one (it has a 4in1 RF module - CC2500, CYRF6936, A7105, NRF2401): Jumper T8SG V2.0 Plus.
Now that everything is set up, we can start the configuration.
Enabling RSSI for AFHDS-2A on Deviation
Since we want to bind to X6B receiver, in Model menu-> Model setup we need to choose the protocol AFHDS-2A and follow the bind procedure (already seen here.
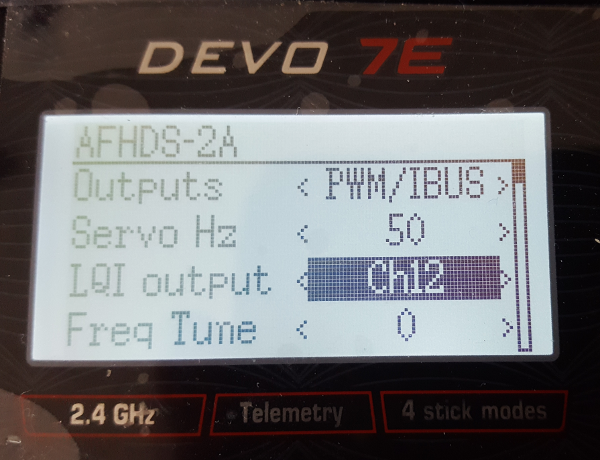
Then we need to enable RSSI on channel 12 by just pressing “ENT” on the protocol itself and setting that value for “LQI output” (stands for Link Quality indicator):
Once that is done we should start seeing RSSI value displayed on Transmitter menu -> Telemetry monitor:
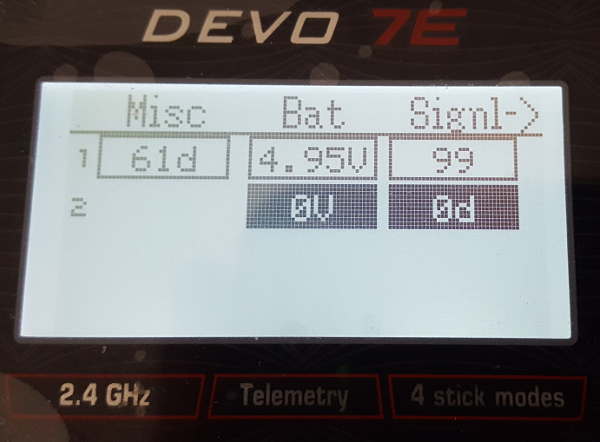
As the image shows, to a signal strength of 99 corresponds a value of 61d.
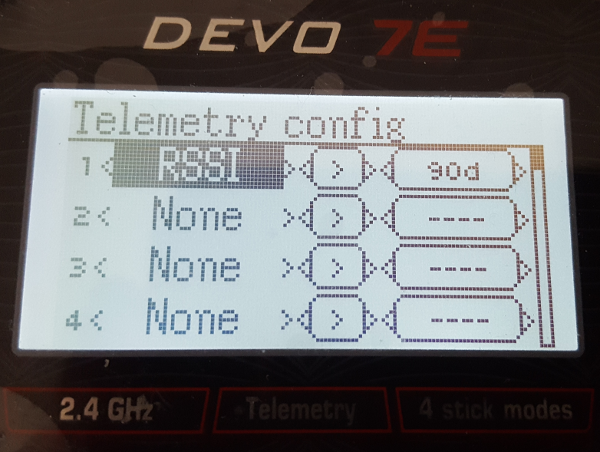
By going in Model menu -> Telemetry config, we can set up an alarm that triggers when the value goes up a certain threshold. I found 90d as a good value to trigger the alert that signals we need to start paying attention to the distance:
We have finished configuring RSSI on the transmitter; next step is to integrate it in Betaflight so we can have the value displayed on the goggles/monitor through OSD while we are flying in FPV.
Betaflight Integration
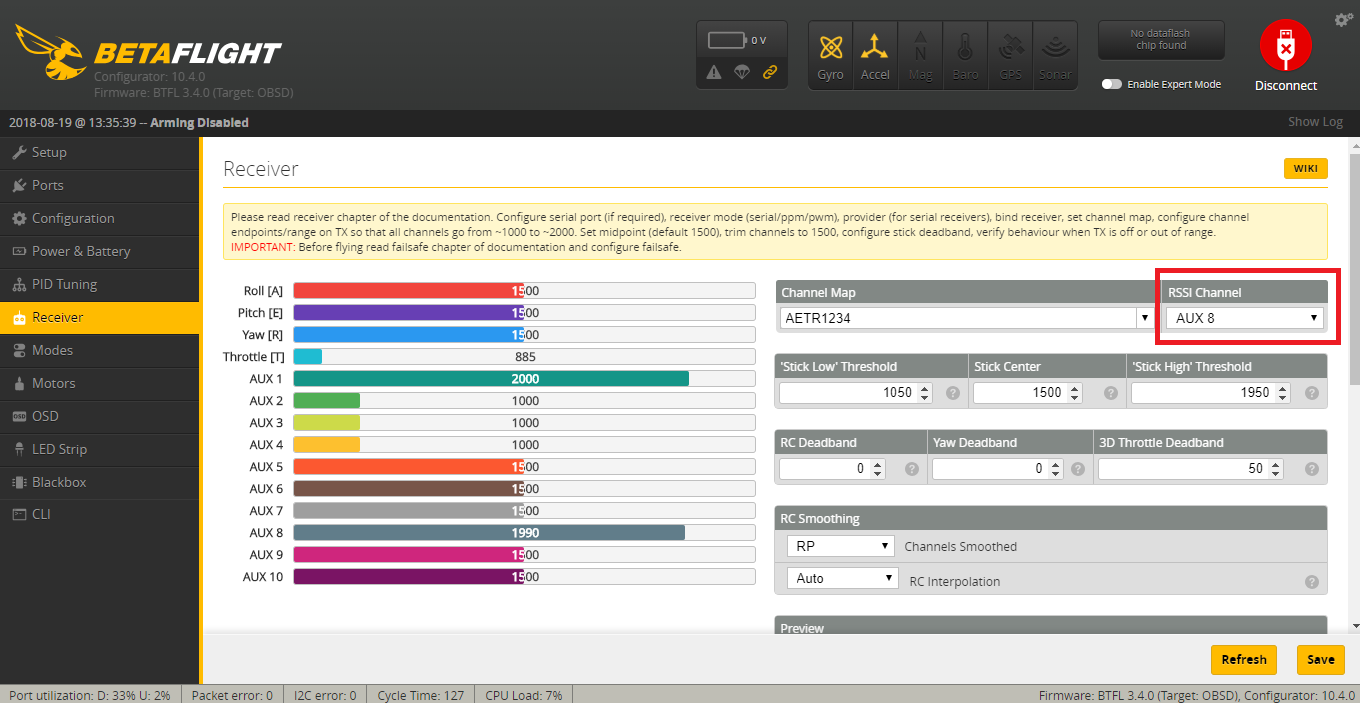
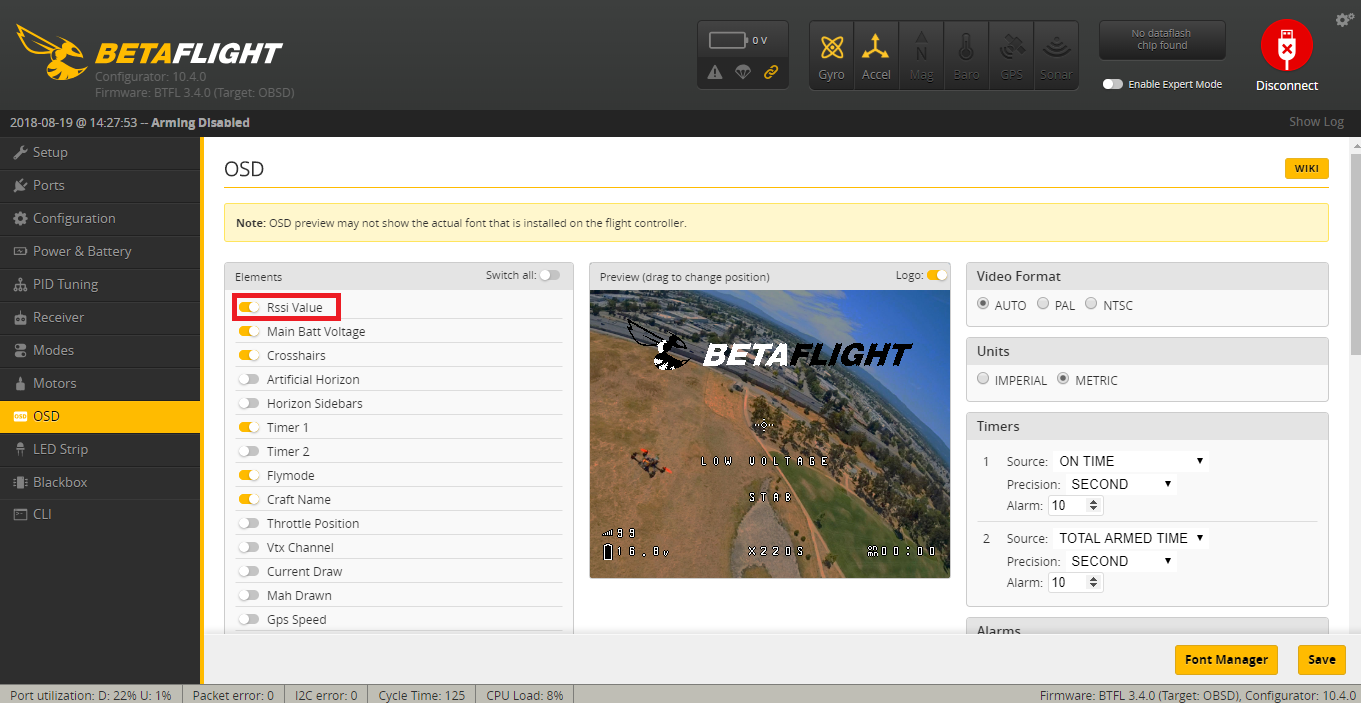
After connecting the quadcopter to the computer, we need to open Betaflight Configurator and navigate to the Receiver tab. Here we can set RSSI channel: even if we have set the value to channel 12 on the transmitter, latest releases of Betaflight use AUX channel number; in order to use the right AUX channel we need to subtract 4 to the channel number, so we need to choose AUX 8.
Finally we can enable RSSI value in the OSD tab so it shows up on the display:
This is the result on the FPV screen:

Conclusions
We have seen how to enable RSSI for AFHDS-2A protocol in Devo 7E loaded with Deviation TX firmware and how to integrate RSSI measurement in Betaflight so it is possible to read the value on the goggles/monitor through OSD during FPV flights.