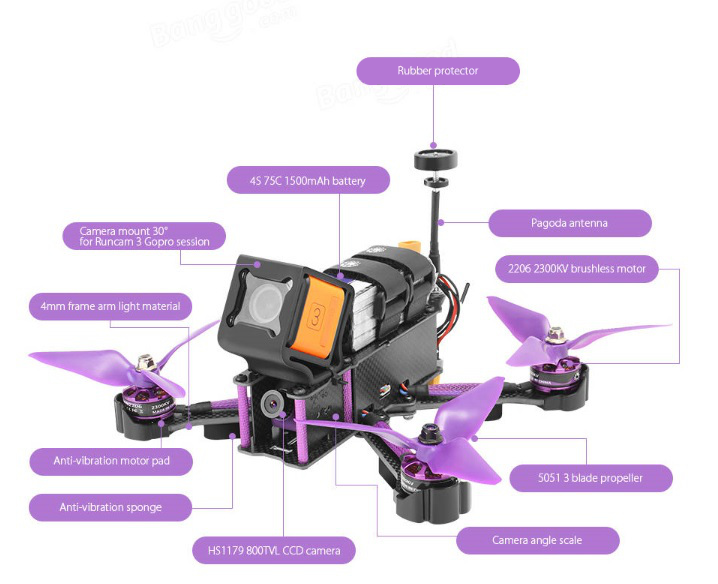
The Eachine Wizard X220S is a 220mm FPV Racing/Freestyle quadcopter and it is the evolution of the X220; it comes both in RTF (Ready To Fly) and ARF (Almost Ready to Fly) version. If you already have a decent transmitter, you can just go for the ARF version and buy a receiver that uses the same protocol as the TX: this is exactly what we are going to see in this article.
Package contents
The ARF version package comes with the quadcopter with the following specifications and accessories:
- Eachine Wizard X220S
- 10 x pairs of Eachine 5051 3-blade propeller
- 30° Camera Mount (For Runcam3/Runcam5/GoPro Session)
- 2 x Battery strap
- 2 x Wrench
Specifications
- Motors: MN2206 2300KV motor
- ESCs: Eachine 30A BLHELI_S 4 in 1 ESC
- FPV Camera: Eachine HS1179 800TVL CCD camera
- VTX: 5.8 GHz 72CH 25MW 200mw 600MW switchable transmitter
- VTX antenna: Pagoda antenna 5.8 GHz
- FC: Omnibus F4 V3 flight controller
- Weight: 356g (without battery and camera)
TX, RX, LiPo Battery, Propellers, Camera Lens
The ARF version does not come with TX, RX and battery. Moreover, I have also replaced propellers and camera lens, so here is my setup:
- Devo 7E loaded with Deviation firmware and additional RF modules so it is possible to bind different models with just one radio controller. In this case, the RF module we are going to use is the A7105 (XL7105-D03B chip) which supports AFHDS-2A (FlySky protocol);
- Flysky X6B 2.4G 6CH i-BUS PPM PWM Receiver for AFHDS: this is a very good receiver with long range reception capability, so, even if you have bought the RTF version of the X220S, I highly recommend to switch to this receiver; alternatively check the last part of the article for the installation of the FrSky XM+ full range receiver;
- TATTU 1550mAh 14.8V 75C 4S1P Lipo Battery Pack: this is a very good quality battery, it performs really well and it is really durable;
- DALPROP T5045C: changing propellers is a must since the given ones are really inefficient and the quality is not as good as it should be (they develop stress marks after few flights);
- 2.5mm 600TVL 1/3” Super Had II CCD Camera Lens or 2.1mm 150° FOV Wide Angle Camera Lens: the stock 2.8mm lens does not offer a good FOV, so it is better to go for a 2.5mm or 2.1mm depending on personal preference. I actually have both and use one instead of the other depending on the situation.
RunCam 3
RunCam 3 camera shown in the images in not included. However RunCam 3 is discontinued and the new version is available, so you can record your flights in HD with WDR (Wide Dynamic Range): RunCam 5. This is a really good quality camera at an affordable price: it has a max resolution of 4K@30fps and it has been built with the main aim of recording FPV racing/freestyle footage (here you can find an overview with a comparison with its predecessors).
Soldering iron and handy tools
Of course, a good soldering iron is needed. I really like this one, which is compact and portable since it can be powered up using LiPo batteries.
In the process, having these tools comes in handy:
- Drillpro 4pcs Hex Screwdriver Tool Kit 1.5/2.0/2.5/3.0mm;
- DANIU 4pcs Metal 4.0/5.5/7.0/8.0mm Hex Screwdriver Set;
- DANIU 25 in 1 Multi-purpose Precision Screwdriver Set.
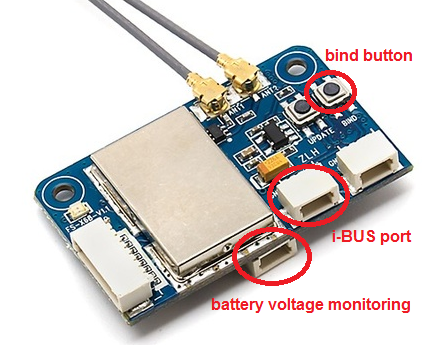
FlySky X6B receiver installation
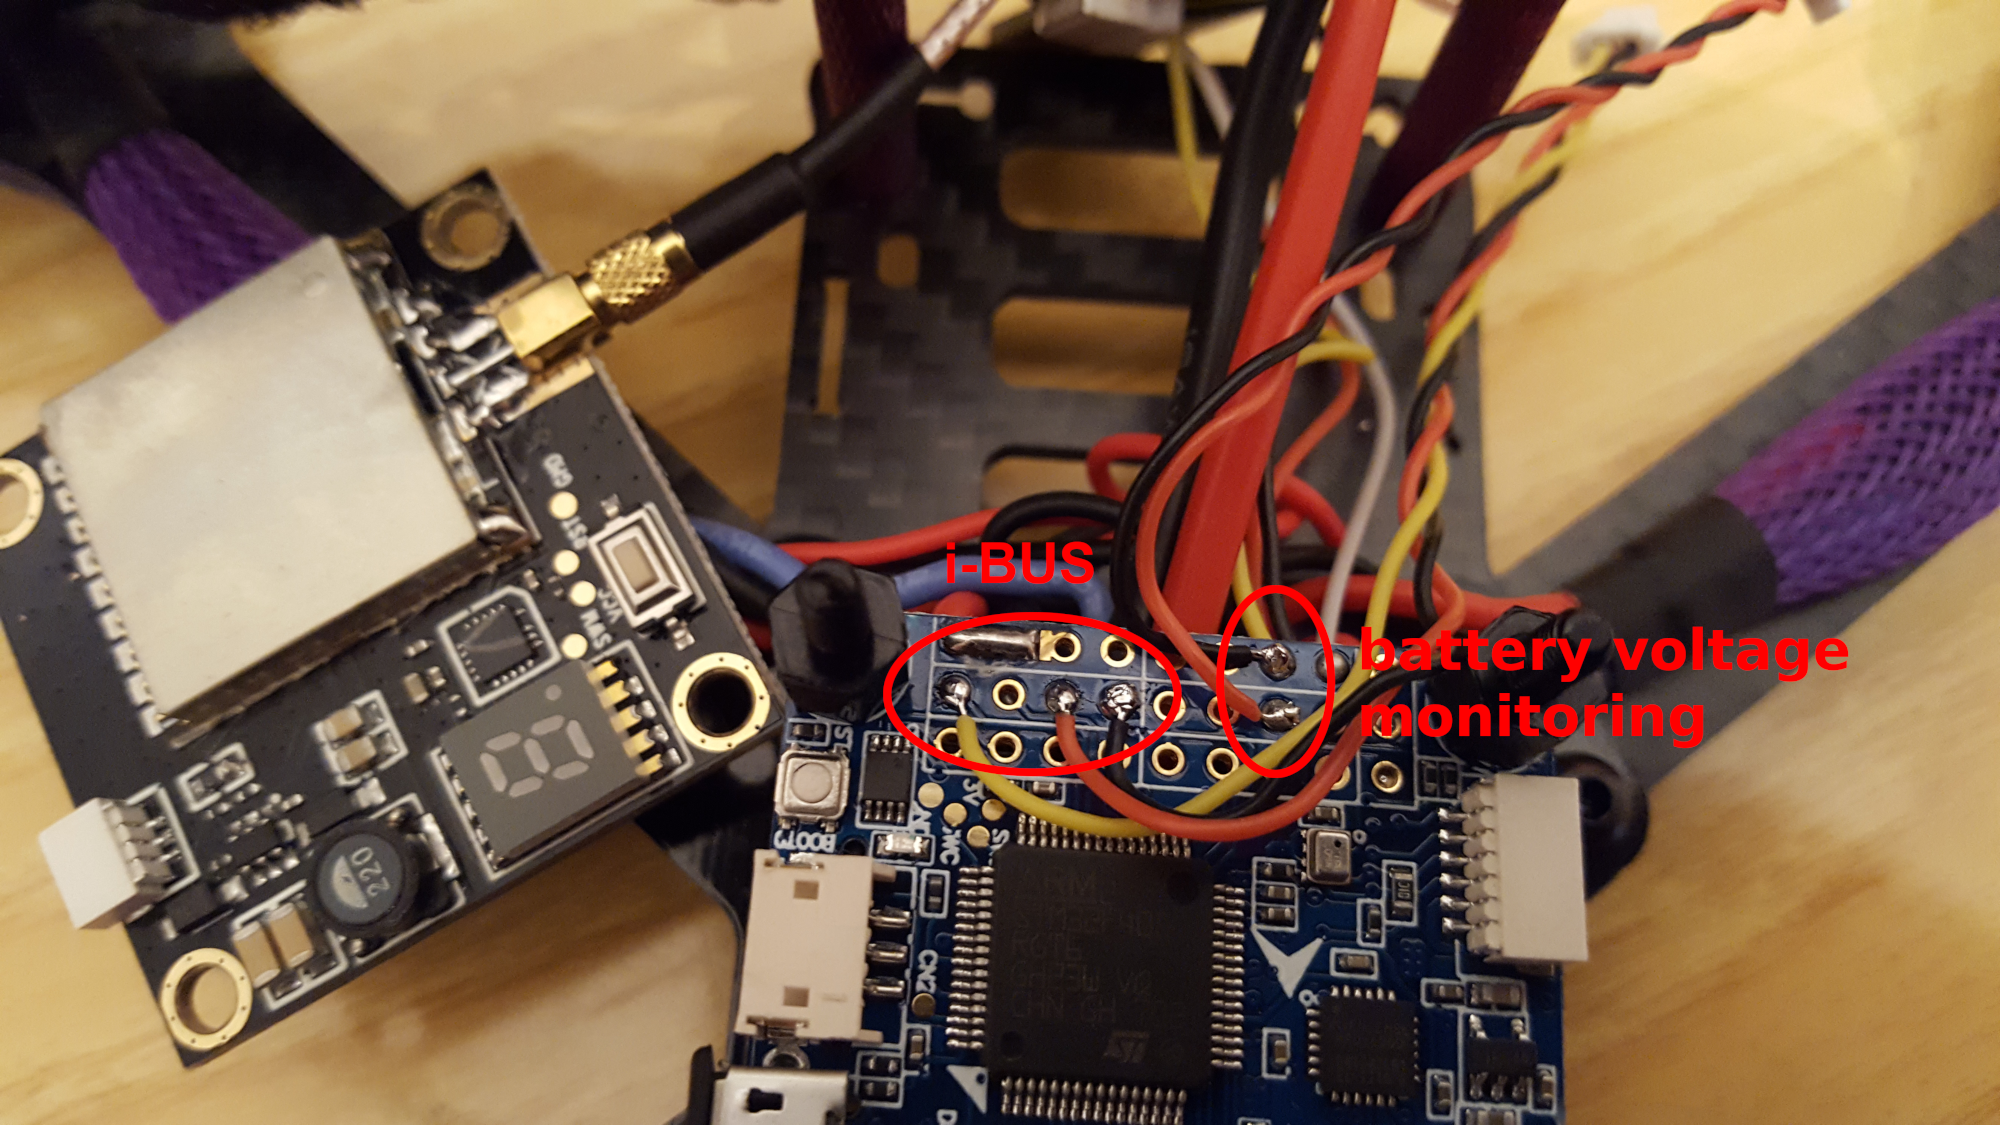
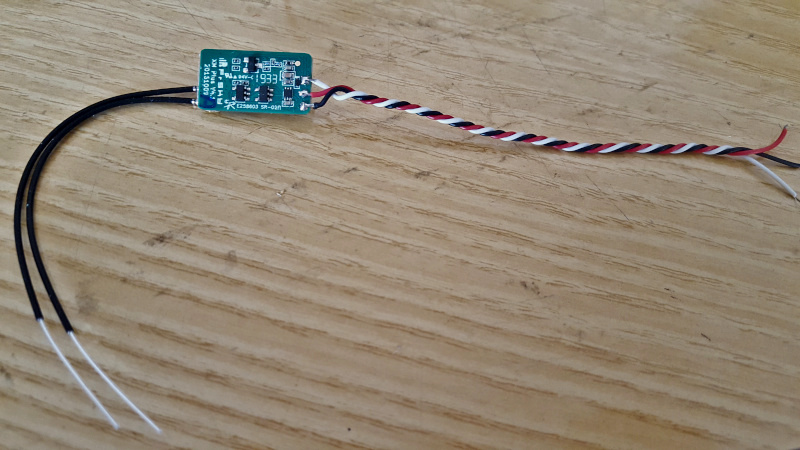
In the receiver package, there are four cables: we need two of them, the one going inside the middle top side port for i-BUS and the one going in the bottom side port that we are going to use for battery voltage monitoring (telemetry on transmitter):
Both cables have three wires (black, red and yellow) with a white connector on one side (the one going into the receiver) and a black one on the other side:
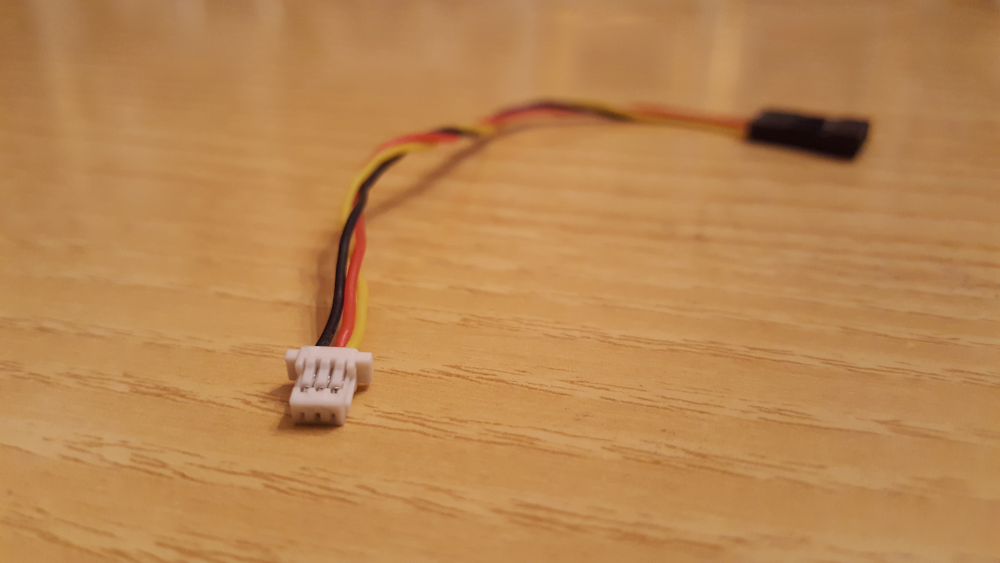
For battery voltage monitoring we just need the red and black wires, so we need to remove the yellow one from one of the two cables. For both cables, the side with the black connector needs to be cut. Then we can strip the wires and prepare them (tin) for soldering on the FC.
Now we need access to the top of the Flight Controller board. To achieve this, we need to remove the top carbon plate (six screws) and the VTX board:
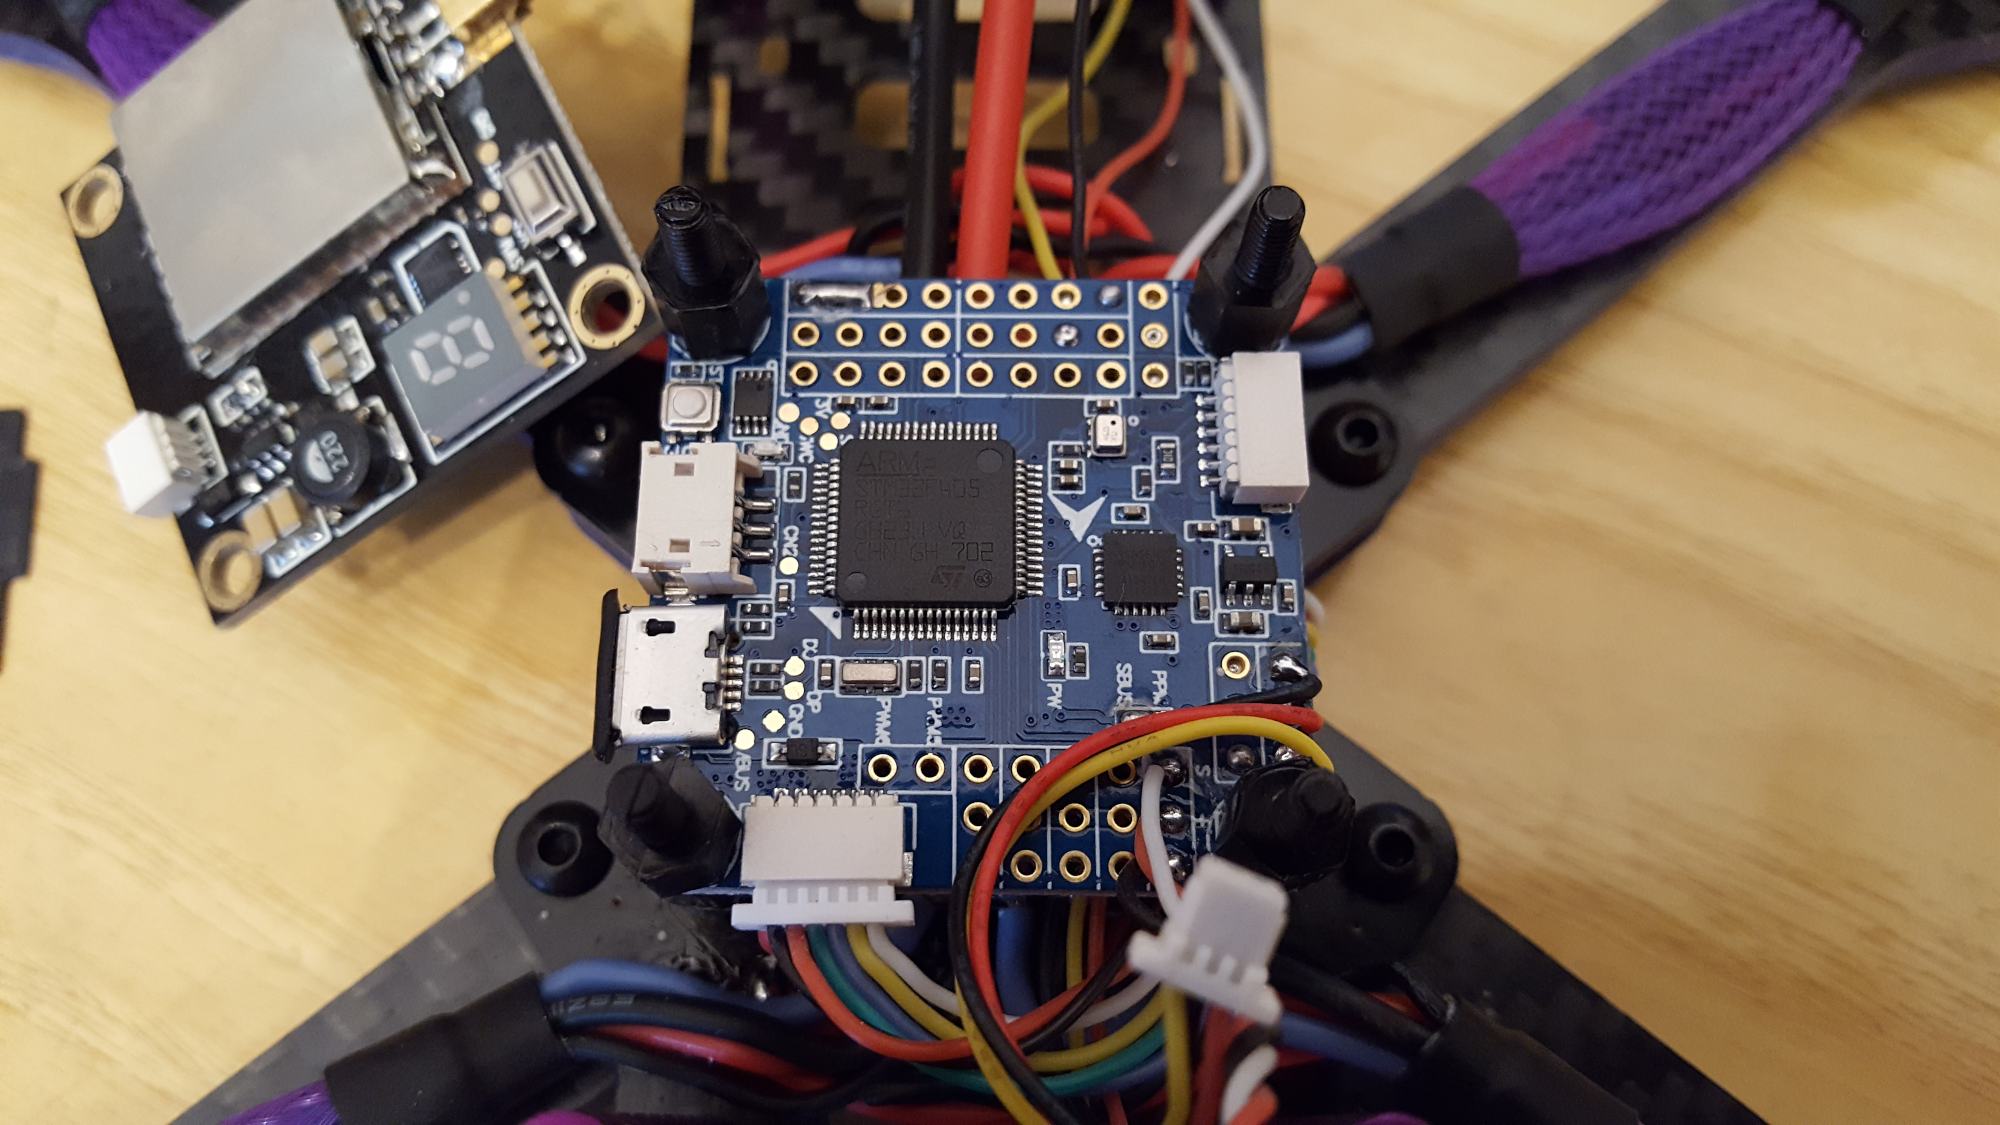
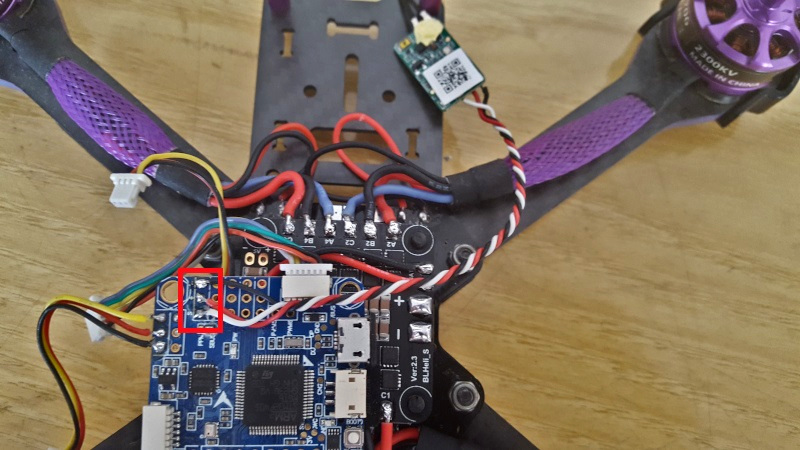
Beware that on PPM pads of the FC there are already soldered three wires (white, red, black) ending up in a white connector (you can see the wires in the image above soldered at the bottom right of the FC): we do not need them for the X6B, so you can unsolder and remove them.
After soldering the wires (remember to tin FC i-BUS pads and wires first for an easy soldering job), this is the result:
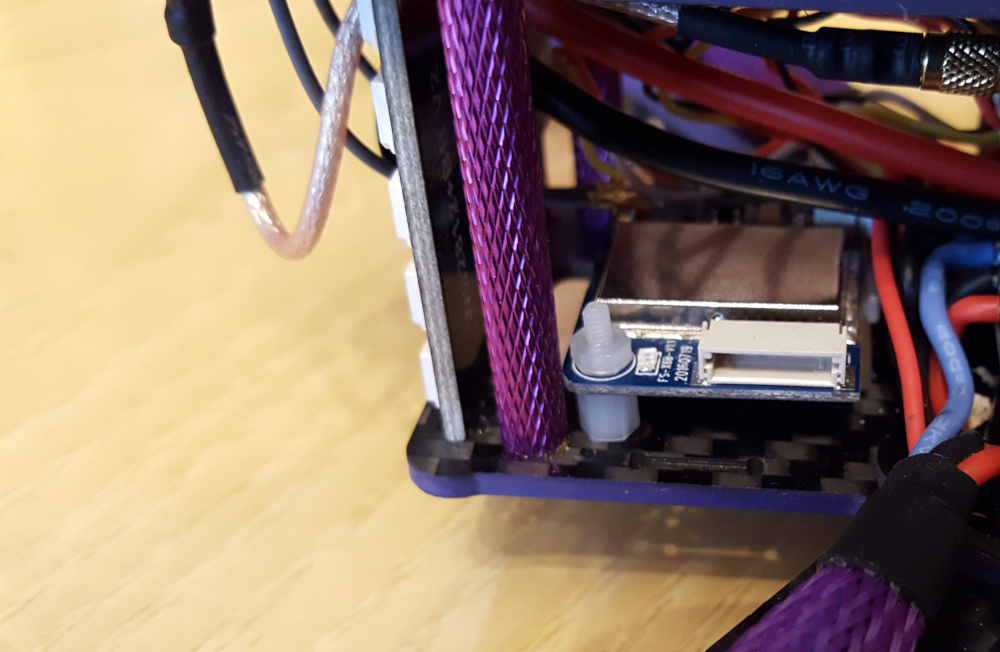
Mounting the receiver
Now we just need to find a good place to position the receiver. A safe spot could be on the rear, on the bottom plate near the leds. To fix the board on the carbon plate we can just use two M2 standoffs.
X6B Binding
If you like Deviation TX firmware and you do not want to solder additional modules inside Devo 7E, there is a new multi-protocol radio already loaded with Deviation firmware, inside which are already installed additional RF modules, including the FlySky one (it has a 4in1 RF module - CC2500, CYRF6936, A7105, NRF2401): Jumper T8SG V2.0 Plus.
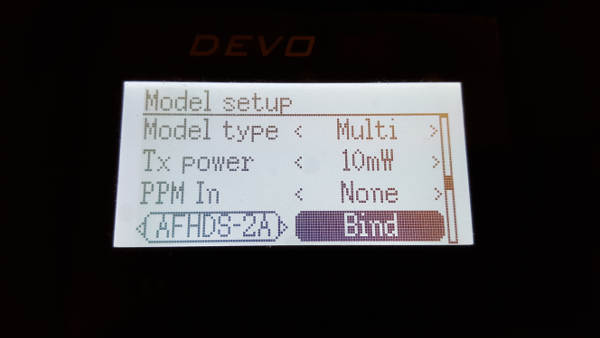
To bind Flysky X6B receiver we need to turn on the quadcopter while pressing the “BIND” button on the receiver and using the binding mode on the TX.
For Devo 7E, loaded with Deviation TX firmware, this can be done in Model menu -> Model setup:
If you want to know how to enable RSSI (Received Signal Strength Indication) including Betaflight integration, this article will guide you step by step.
FrSky XM+ receiver installation
In case you have an FrSky transmitter instead, like the FrSky Taranis X9D Plus SE 2019, here is how to connect the FrSky XM+ full range receiver to the Eachine Wizard X220S flight controller.
We need to solder three wires on FrSky XM+ receiver pins like shown in the next image:
Then connection of FrSky XM+ receiver to the Eachine Wizard X220S flight controller is done by soldering the wires coming from the receiver to the FC SBUS pins as reported in the image below:
- white wire -> signal wire (S)
- red wire -> positive (+)
- black wire -> negative (-)
Conclusions
We have seen an overview for Eachine Wizard X220S ARF version and how to set up X6B i-BUS receiver.
In the next article we are going to talk about the setup and configuration of the quadcopter in Betaflight Configurator.
If you have flashed or you are planning to flash the latest version of Betaflight firmware here is the setup and configuration on Betaflight 4.2 firmware.
If you want to upgrade Betaflight firmware for the Omnibus F4SD on the Eachine Wizard X220S, read this article.
If you want to update Eachine Wizard X220S BLHeli 4in1 ESC firmware, read this post.
If you are experiencing yaw wobbling, here is the resolution.
If you want to know how to setup and configure the 1179 FPV camera that comes with the quad, take a look at this article.
If you are experiencing video noise appearing as horizontal lines on the FPV camera view when motors are spinning, here is the resolution.